A Guide to Cobra Bracing
Any arborist understands that damaged or ageing trees can cause a risk of harm to life and property, due to broken or fallen branches. Common indications that trees might be in a less-than-optimal condition are:
Cracked, snapped, or sagging branches;
Visibly leaning trunk;
Uplifted roots;
Abnormal swaying during high winds;
Splitting of the trunk or at branch junctions.
Some of the factors that can weaken a tree are:
The age of the tree;
The weight of the branches;
Wind or storm damage.
The Solution
Tree Cabling v Tree Bracing
The original method used to stabilise and protect trees was known as ‘steel bracing’ – a system used 20 plus years ago. This involved the invasive use of steel cables and rods, which was subsequently harmful to trees. However, since then, technology and innovation has improved enormously.
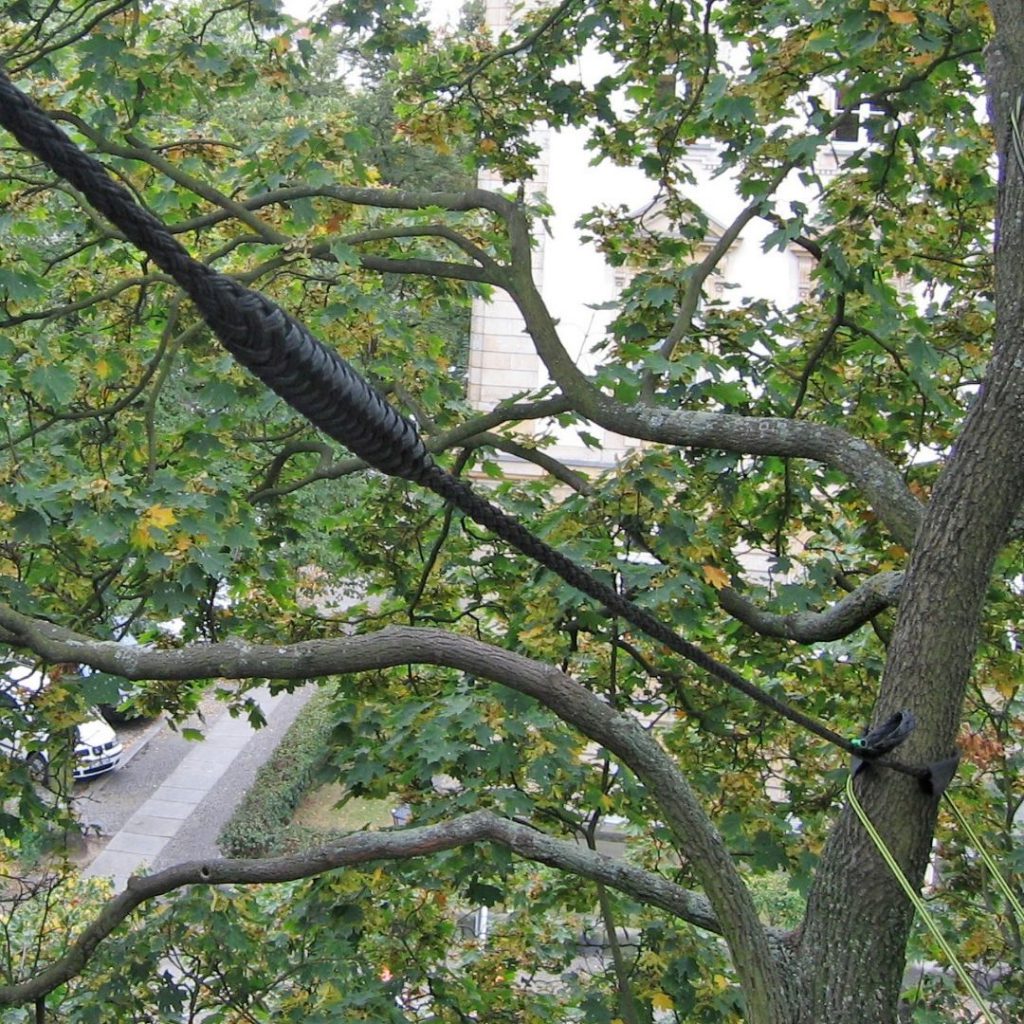
Nowadays, ‘Cobra Bracing’ is the most effective type of tree support system. Cobra Bracing provides added structural support by effectively limiting the movement of branches, thus reducing the risk of damage, and extending the tree’s lifespan. Cobra bracing has been a successful technological advancement and is the ‘go-to’ solution for arborists worldwide with its proven track record since 1993.
Why use Cobra Bracing?
Benefits to trees – Cobra Bracing is not harmful to trees and can be comfortably adapted to a variety of tree structures. It is installed to offer a great elasticity; it grows with and protects the tree.
Safety – Cobra Bracing meets the technical requirements of the German ZTV standards and the American ANSI A300.
Appearance – This system is almost invisible from the ground even when the trees are not in leaf. It is not aesthetically displeasing.
Durability and longevity – Cobra Bracing retains 12 years of rated tensile strength thanks to UV materials. One of the system’s unique features is it’s use of shock absorbency through an integrated shock absorber component. Another key feature is the ‘expansion insert’, which flattens the contact
area, reducing pressure that may contribute to girdling. Finally, the anti-abrasion hose allows the rope to slide freely around the connection point.
Easy installation – Quick and easy to install, the material is incredibly strong yet comfortable to handle, with its soft mesh braiding and does not require the use of specific tools; scissors are required to cut the rope and hose and a lighter or heat torch are required to shrink the end cap.
Additional features The Cobra bracing system features ‘end caps’ – coloured identification of the installation year. Cobra bracing is fully recyclable and offers four different systems, depending on the branch size of the tree:

Shock Absorbing v Non-Shock Absorbing
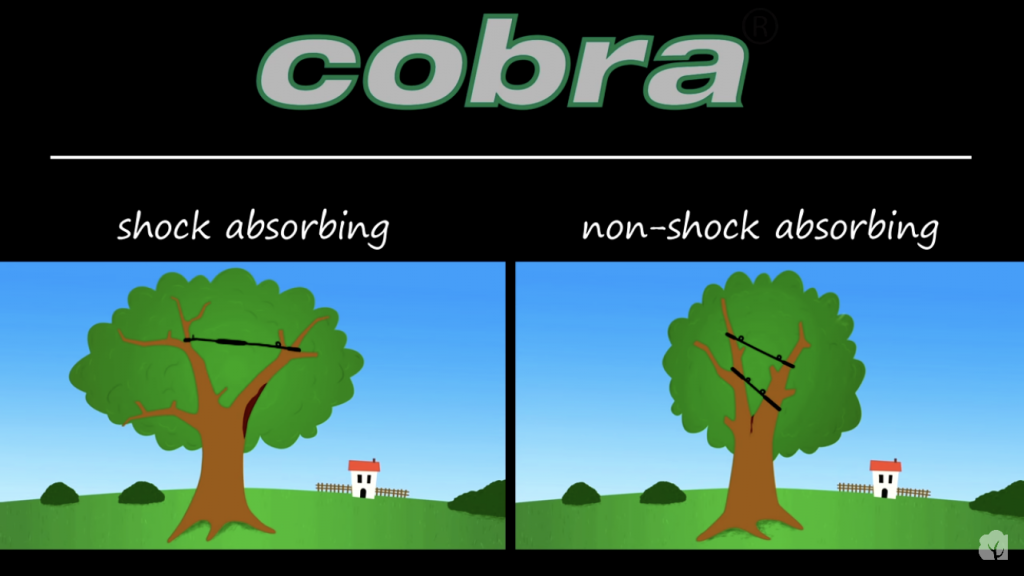
Shock Absorbing
Cobra Bracing can make the use of a shock absorber which is designed to prevent a ‘crotch’ (the meeting point of two branches) from splitting. This method is assembled in the two third region of the crown to make optimal use of the leverage effect.
Non-Shock Absorbing
The non-shock absorbing method is Intended to minimize strain to limits and to prevent a weak crotch from opening or re-opening.

Dynamic Breaking/Cabling, Static Breaking/Cabling and Load/Support Cabling
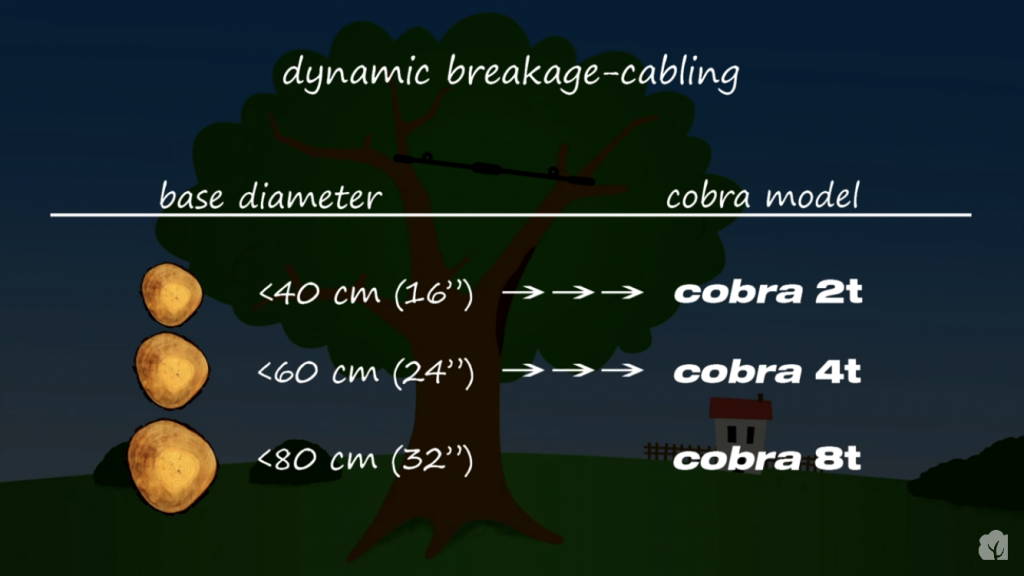
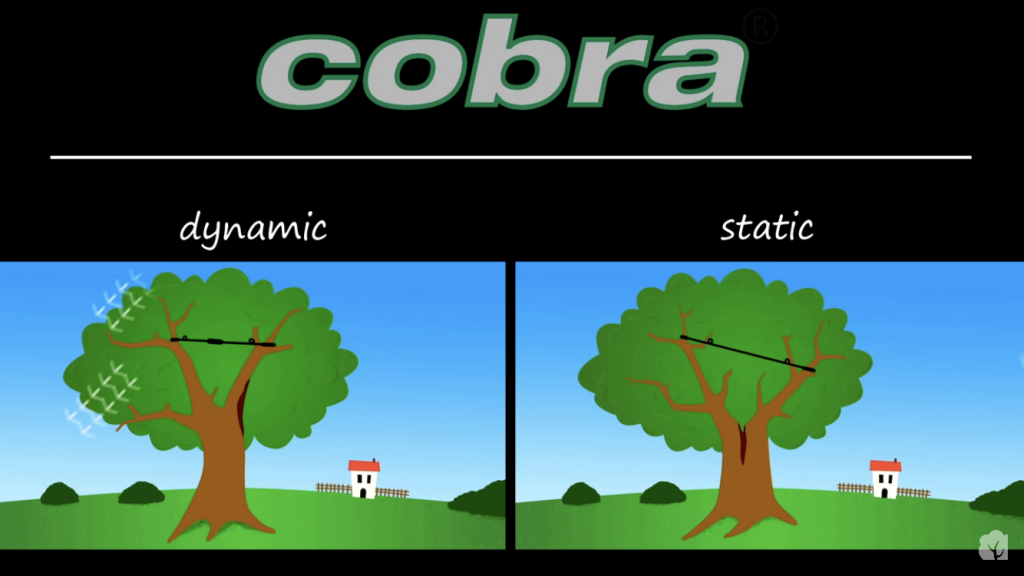
Dynamic Installations are the standard type used for cobra – they restrict excessive swinging motion and disrupt wind loads between branches to help support the crotch below. The Cobra model chosen is dependent on the base diameter of the branch to be cabled (see the table above).
Static Braking Cabling – non-shock absorbing installations more intently restrict independent movement of involved branch parts to prevent a weak crotch from opening or re-opening.
Load/Support Cabling – If there is a threat of a broken branch falling to the ground with a potential of endangering life or causing damage to property, it can be secured by installing a static load/support cabling cobra system without a shock absorber. The bracing should be installed as vertically as possible so that, should the branch fall, it will hang in the rope. The only acceleration will be from the rope extension so there will be little or no shock loading. The rope and anchor point should be sufficiently strong for the weight of the branch.

THE ASSEMBLY PROCESS – a step by step guide – The process of installation is easy for any arborist:
- Select the correct length of expansion insert – this should be at least two thirds of the branch diameter.
- Grasp the cable at a distance – (the length of the expansion insert, plus around 16 inches) and feed the insert towards the cable end. Hold the expansion insert from the outside of the rope while pulling the rope slack over it.
- Determine length of the anti-abrasion hose – this should be at least the diameter of the stem to account for future growth. Cut the anti-friction hose and feed the cable inside it.
- Place the cobra cable around the branch and begin to splice it. The splice itself should reside away from the branch and not tight against the stem.
- Feed the end inside the rope a few inches past the previous exit point and work it through the rope six inches and then pull the end of the rope out, so that the heat shrink cap is visible. Note the reserve loop beyond the splice and insert the shock absorber.
- Check the final cable path to ensure that the rope will not be rubbing against other branches. After repositioning to the opposing stem, tension the cobra rope in order to find the subsequent position of the expansion insert. Here, insert the expansion insert into the cable.
- Before cutting the cable to length, place it around the branch, form an imaginary splice and growth reserve loop and cut the cable at this point.
- Slip on a heat shrinking end cap for the appropriate year. You can write on this if necessary. Next, cut the anti-abrasion hose to length as previously described and position it on the cable.
- Finish by creating a splice and a growth reserve loop as performed around the first branch.
- Tension the cabling so it’s only slightly slack. In winter, cobra is mounted with more slack in order to avoid continuous tension brought on by the weight of summer foliage. Now tighten the cobra cabling by hanging or standing on it. In this way you can ensure that all parts are firmly interlocked.
- You can cable three or more branches very effectively with all sizes of cobra. The wind load can be shifted from the weak branch to a stronger one and the swaying motion is restricted to prevent the branch from breaking in strong winds. However, cobra does not prevent the tree from swaying naturally in light winds. A triangular bracing is an ideal solution as it restricts excessive wind load in all directions. In certain situations, it is only desirable to brace a tree from near imminent failure. In this case you should assemble the cobra without the shock absorbers and as vertical as possible. In this way, the branch will be held in place directly following breakage and with as little distance for shock loading forces as mechanically possible.
- The necessary breakage load of the system is dependent on the weight of the branch. As an estimate you use the basic diameter of the branch to be restrained, the cobra 2t can be used for diameters of up to 12 inches, the cobra 4t for those up to 16 inches, the cobra 8t for those up to 24 inches. Cobra 8t can be doubled up for diameters of up to 32 inches at the branch base.
What do each of the Cobra Bracing Systems include?
- 100m Rope
- 30 End Caps
- 30 Expanding Inserts
- 25m Anti-Abrasion Cover
- 15 Shock Absorbers
- 1 Mini Blow Torch
- Instructions
- 50 m Rope
- 12 End Caps
- 10 Expanding Inserts
- 10m Anti-Abrasion Cover
- 5 Shock Absorbers
- 1 Mini Blow Torch
- Instructions
- 40m Rope
- 8 End Caps
- 8 Expanding Inserts
- 12m Anti-Abrasion Cover
- 4 Shock Absorbers
- 1 Mini Blow Torch
- Instructions
*Each of the above kits are designed for use for multiple trees. However, individual items can be purchased individually if the requirement is only a one-off.
